ISU Audio & Arduino Clubs
Arduino Bootcamp
Getting started with Arduino
The first thing is to obtain an Arduino and a USB cable to connect it to the computer that you will use to write the Arduino code. For most of our Boot Camp activities, it is assumed that you are using a standard Arduino UNO R3 with an Atmega328 chip. For the UNO R3, the USB cable should have type A on one end and type B on the other — the type of cable that has been used to connect printers for years. There are many places to buy an UNO R3, including directly from Arduino. (In 2026, prices seem to vary from $25 - $30.) There are certainly much cheaper knock-offs. These may work just fine, or they may not. It is likely that you have a compatible USB cable lying unused in a drawer somewhere. (If not, steal one from your roommate's printer — chances are that they will never miss it.)
You will need to download and install the Arduino IDE software for your computer. The installation is straight forward, but if you need help, there are plenty of links on the download page.
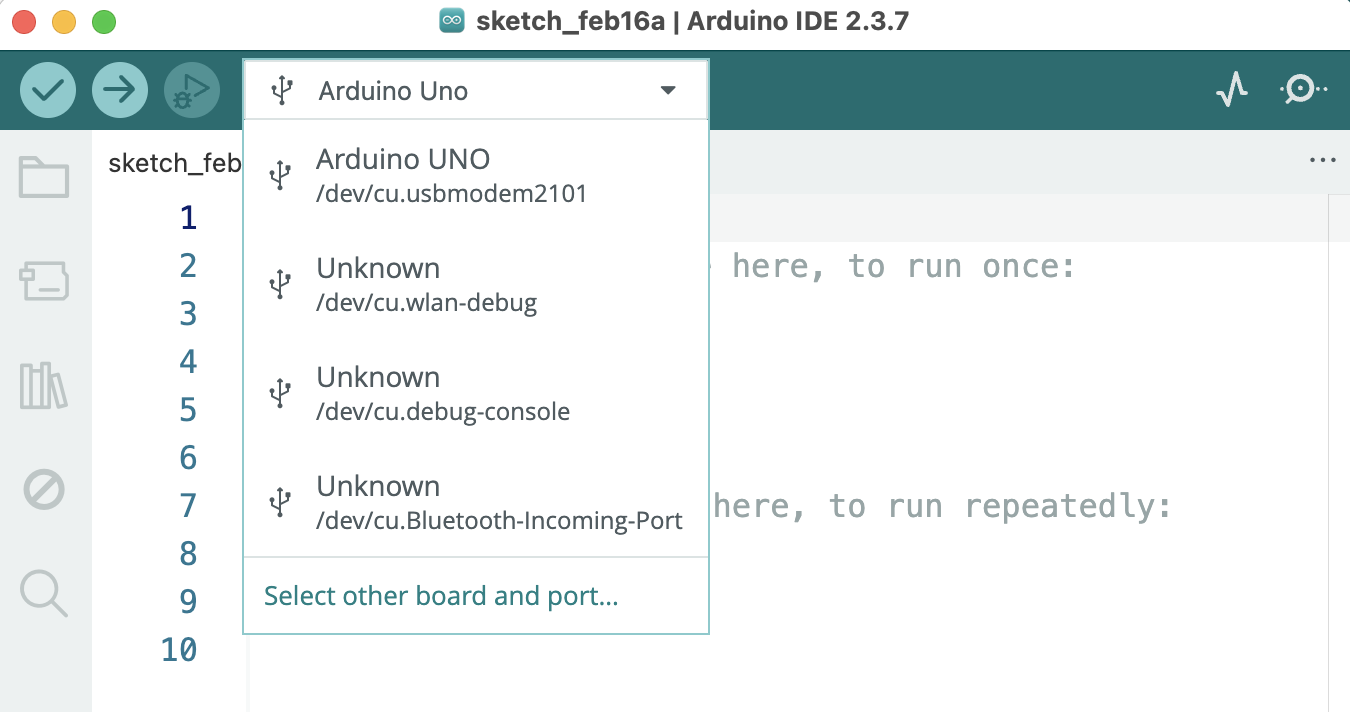
Next, use the USB cable to connect the Arduino to your computer and launch the Arduino IDE application. The program will start by opening a window with a bare program. Near the top of the window is drop-down menu labeled "Select Board". From menu, select "Arduino UNO", enabling the IDE to communicate with your board. The interface options will look slightly different depending on your type of computer — Windows, MacOS, or Linux. (After this first run, the IDE will probably select the UNO board automatically when starting up.)
Arduino refers to programs as "sketches". The blank sketch that opened shows the basic structure of an Arduino program, which is slightly different from C programs that you may have written using conventional C compilers. The structure reflects the inherent nature of a microcontroller, whereby a piece of code is repeated over-and-over forever.
A conventional C program has a "Main" function that runs once, starting at the beginning and running through the code until it reaches the final statement. There may be many loops within "Main" that cause the program to run for a very long time, but there is a definite end point. A standard Arduino sketch has two functions: "setup" and "loop". Setup is like Main in that it is intended to run once from beginning to end. Loop, on the other hand, is intended to run forever. Initially, loop starts at the beginning and the code is executed through to the end. Then execution goes back to the beginning of loop and runs through to the end. And then again. And again. Repeating forever until the end of time, which for a microcontroller is defined as when its power is disconnected. From the perspective of C coding, the loop function behaves just like a while statement with condition that is always true: while( 1 ) { do something }.
As the name implies, the setup function is used to get everything set up for the impending action that occurs within the loop function. In setup, pin functions can be defined, peripherals initialized, starting values can be loaded into variables, initial readings from sensors can be taken. It's a bit like getting a plane ready for take off. The once everything is set, all of the fun stuff takes place within the loop function.
The Blink example
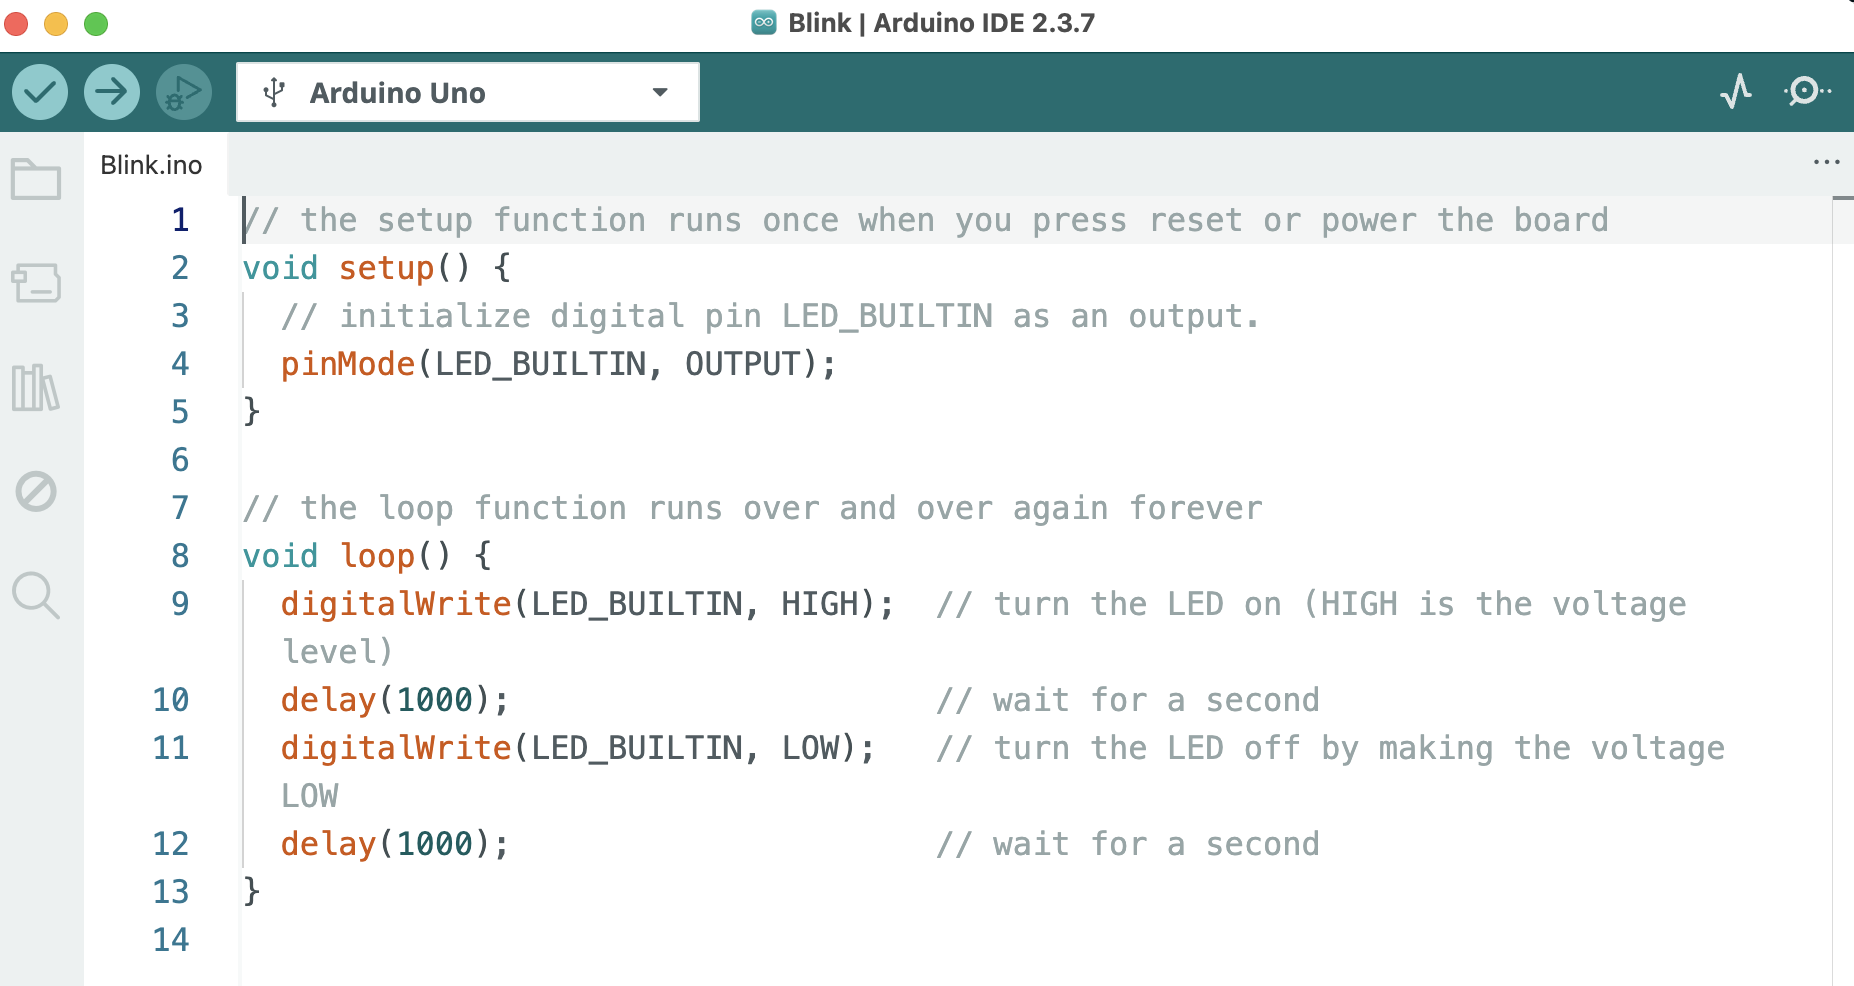
The Arduino sketch structure is easy to illustrate with an example. The Arduino IDE comes with several built-in example sketches. A nice example is the "Blink" sketch. Open it by selecting the menu item: "File > Examples > 01.Basics > Blink". (Note: The Blink sketch comes with several comment lines at the beginning. Read them if you want, but they have been deleted here to save space.)
Looking at the code:
- Comments (text that will not be compiled or executed) are denoted with a double slash, "//".
- Inside the setup function is a single command:
pinMode(LED_BUILTIN, OUTPUT);. LED_BUILTIN is a defined constant equal to the number 13. The pinMode command defines Arduino pin 13 to be a digital output, meaning that the voltage on it can be set either "high" (= 5 V) or "low" (= 0 V). Pin 13 has a yellow light-emitting diode (LED) and a current-limiting resistor permanently connected to it on the board, hence the name. Defining the function for this one pin is all that is needed in setup for this simple sketch. - The first item inside the loop function is
digitalWrite(LED_BUILTIN, HIGH);, which has the effect of setting the output of pin 13 to "HIGH", meaning 5 V. Applying 5 V across the LED/resistor combo causes current to flow through LED so that it lights up. It will stay lit for as long as the pin voltage is high. - Next is
delay(1000);. The name says it all — program execution is delayed for 1000 milliseconds (= 1 second ). The controller just stops and counts out 1000 ms before moving on the next command. - Next is
digitalWrite(LED_BUILTIN, LOW);. This is the opposite of the previous digitalWrite command — the output of pin 13 is set to "LOW", meaning 0 V. With no voltage across the LED/resistor combo, no current will flow, and the LED turns off. - Finally, there is another delay statement, pausing any execution for another 1000 ms.
- Then program execution goes back to beginning of loop.
The Blink sketch does exactly what it says: blinks an LED — on for one second and off for one second.
Finally, transfer the code to the Arduino by clicking the right-arrow near the top left corner of the window. (Or using the "Sketch > Upload" menu item.) The code will be compiled and sent to the Arduino over the USB cable. There will be some cryptic messages at the bottom of the IDE window, indicating the progress of the transfer and telling how much memory is being used. Assuming that there are no problems, the yellow LED on the Arduino should start blinking on and off. Profound! (Since this is a canned sketch, the only real problem might be in the board selection process. If the IDE complains about not having a board defined, try choosing "Arduino Uno" from the drop-down menu again.)
That's it! If you've gotten this far, you have probably exceeded what most people manage to accomplish with Arduino. Try moving on the other exercises in the Boot Camp to see what else can be done.